emahiro/b.log

Drastically Repeat Yourself !!!!

PhotoLibraryから画像を選択して画面に描画する実装

画像を選択してUIImageに表示させるという処理を実装します。

手順

UIImagePickerControllerDelegateUINavigationViewControllerDelegate を実装したViewControllerに継承させます。

UIImagePickerControllerDelegate…UIImagePicler → Libraryから画像を取得(pick)するためのViewController UINavigationControllerDelegate…画像を 取得するControllerに遷移しているのUINavigationViewContorollerを介して(動作としてはUINavigationViewController)いるので、この動作を対象のViewControllerに移譲する。

UIImagePickerControllerDelegateを継承することで、

func imagePickerControllerDidCancel(_ picker: UIImagePickerController) {}
func imagePickerController(_ picker: UIImagePickerController, didFinishPickingMediaWithInfo info: [String : Any]) {}

の2つのメソッドが対象のViewControllerで利用できるようになる。

上記2つのメソッドについては Cancel は写真ライブラリから戻るときだとわかりやすい。

imagePickerController(_ picker: UIImagePickerController, didFinishPickingMediaWithInfo info: [String : Any]) のメソッドは UIImagePickerControllerDelegate プロトコルの持っているメソッド。

公式リファレンスはこちら
https://developer.apple.com/reference/uikit/uiimagepickercontrollerdelegate/1619126-imagepickercontroller

第一引数 picker … The controller object managing the image picker interface. ピックアップする動作(interface)
第二引数 info : Dictionary…
A dictionary containing the original image and the edited image, if an image was picked; or a filesystem URL for the movie, if a movie was picked. The dictionary also contains any relevant editing information. The keys for this dictionary are listed in Editing Information Keys.

originalImageとeditedImageをdictionaryが持っている。
JumpRighitInではoriginalimageを使っている。

UIImagePickerControllerOriginalImageの公式リファレンスは以下
https://developer.apple.com/reference/uikit/uiimagepickercontrolleroriginalimage

let UIImagePickerControllerOriginalImage: String

UIImagePickerControllerOriginalImage はImageと付いているが、UIImageを取り出すためのKey。
infoにKVSでUIImageが格納されている。

infoに保存されているUIImageのdectionaryでvalueを取り出すためのキーの一覧
https://developer.apple.com/reference/uikit/uiimagepickercontrollerdelegate/editing_information_keys

公式のリファレンス見ると、iOS側のimagePickerControllerで用意されているものが多く、普段使っているアプリ内の画像選択でも似たいような処理になっているところは多いので、イメージしやすかった。
コードからTableViewのeditボタンを生成する

UINavigationViewControllerをEnbedInしている状態で編集ボタンをコードから生成する。

navigationItem.leftBarButtonItem = editButtonItem

これで該当NavigationControllerを設置している箇所に対して、左上に編集ボタンを配置できる。

また、TableViewControllerで、

// Override to support conditional editing of the table view.
override func tableView(_ tableView: UITableView, canEditRowAt indexPath: IndexPath) -> Bool {
    // Return false if you do not want the specified item to be editable.
    return true
}

// Override to support editing the table view.
override func tableView(_ tableView: UITableView, commit editingStyle: UITableViewCellEditingStyle, forRowAt indexPath: IndexPath) {
    if editingStyle == .delete {
        // Delete the row from the data source
        tableView.deleteRows(at: [indexPath], with: .fade)
    } else if editingStyle == .insert {
        // Create a new instance of the appropriate class, insert it into the array, and add a new row to the table view
    }
}

上記箇所のコメントアウトを外す。

// Override to support conditional editing of the table view.
override func tableView(_ tableView: UITableView, canEditRowAt indexPath: IndexPath) -> Bool {
    // Return false if you do not want the specified item to be editable.
    return true
}

編集可能にする上記はTrueにする。

NSCodingのinitについて

さまり

Jump Right In でNSCodingを初期化する時に required と convenience を使って初期化している意図がわからなかったので調べた話

NSCodingの初期化について

公式のリファレンス https://developer.apple.com/reference/foundation/nscoding/1416145-init

init(coder:)
Required. Returns an object initialized from data in a given unarchiver.

NSCodingのinitの実装箇所にジャンプしても require 修飾子はついていなかったものの、公式リファレンスには、require が必須と書いてあった。

NSCoding は2つのメソッドの宣言を必要とする

  1. encode(aCoder: NSCoder) → KVOで値を保存(Archive)する
  2. init(aDecoder: NSCoder) → KVOで保存した値を解凍(UnArchive)する

上の2つのメソッドを宣言することでモデル層でKey Value Object形式であたりをアプリ内に保存します。

UIViewControllerのprepareメソッドについて

さまり

  1. prepareメソッドが理解できずにいた件
  2. swiftの外部引数と内部引数について

prepareメソッドが理解できずにいた件

prepare(for: ,sender:)メソッドがなかなか理解できずにいて、ようやく理解したので、その備忘録です。

まずprepare(for: ,sender:)について公式のリファレンスでは以下のように記載されています。
公式リファレンス

prepare(for:sender:)
Notifies the view controller that a segue is about to be performed.

func prepare(for segue: UIStoryboardSegue, sender: Any?)
// segue ... The segue object containing information about the view controllers involved in the segue.
// sender ... The object that initiated the segue. You might use this parameter to perform different actions based on which control (or other object) initiated the segue.

訳すと、segueが動作することをViewControllerに通知するということ。
取る引数については
segue : 動作するsegue
sender : 次のViewControllerに送信するObject(Any?だからなんでも送れる)

んで何がわからなかったかというと、メソッドのリファレンスにある (for segue: UIStoryboardSegue, sender: Any?) っていうかしょ。
for ってなに?っていうのが最初に抱いた疑問でした。

実装コードの中で親クラスの prepare メソッドを呼ぶ時に

super.prepare(for: segue, sender: sender)

って記述があって、最初のほう、頭混乱してました。
で結果なんですが、これ外部引数と内部引数なんですね。

外部引数と内部引数について

swiftはメソッドの呼び出し時に使用する外部引数と、メソッドの内部で利用する内部引数の2つを持つことができます。
外部引数と内部引数を分けるためには、 外部引数名 内部引数名 : 型 と書き方をします。
prepareメソッドで prepare(for segue: UIStoryboardSegue, sender(Any?)) と記載されていた箇所ですが、

for : 外部引数
segue : 内部引数

だったわけです。そのため、swiftでメソッドをドキュメント等で記載する時に prepare(for:,sender:) という書き方をしていたわけです。
ドキュメント等への書き方の場合は、外部引数を使います。
外部引数と内部引数がわかると、segue という変数はメソッド内部で変数の振る舞いがわかりやすいから内部引数と外部引数で分けています。
swiftでは可読性を上げるために、外部引数と内部引数を併記する場合があります。

例えば、ユーザーを特定のグループに招待するというメソッドを考え見ると

func invite (user : String, to group: String) {
    print("\(user)\(group)に招待します。")
}

となります。 この場合このメソッドをコールするときには

invite(user: "Taro", to: "Swift")

となり、誰をどのグループに呼んだのか、メソッドからわかり、可読性が上がります。
ただし、inviteメソッド内部では、変数が to のままではメソッド内部の振る舞いがわかりづらいので、メソッド内部では group という変数を使ってメソッド内部での可読性もあげています。

使うと非常に便利ですが、まだ、外部引数と内部引数を分けたコードについて、読み慣れていないので、prepareメソッドの理解の部分でハマりました。

emacsのパッケージをcaskで管理する上で気をつけていること

emacs のパッケージ管理

  • emacs 25.1
  • cask を使ってパッケージの管理をしていたりします

一応githubemacsのパッケージリストは公開中
my emacs conf

えぐさま

  1. Vagrantで立ち上げた仮想環境でcaskが動作しない
  2. Macでcaskを入れる場合とcentOSでcaskを入れる際の手順が違っていた
  3. centOSでcaskを入れる
  4. 作成済み.emacs.dのディレクトリ内にあるCaskを使ってパッケージをインストールする

手順とハマったところ

手順

  1. centOSyumemacsを入れる
  2. centOSにcaskを入れる
  3. caskでパッケージをインストールする

centOSyumemacsを入れる

まず最初にここでハマりました。

$ sudo yum install -y emacs
# emacs 23.* がインストールされてしまう

yumで管理されているemacsのパッケージが古く、自分の用意したemacs のcaskで管理しているパッケージが25.1用だったので、cask登録時にバージョン違いのエラーが起こりました。

そこでcentOSemacs 25.1 を入れます。
yumで入れられないので、ソースからコンパイルします。

このあたり参考にしました。
Installing Emacs 25.1.1 on CentOS 6.8

$ sudo yum install -y xz
$ curl http://core.ring.gr.jp/pub/GNU/emacs/emacs-25.1.tar.xz | tar Jxf -
$ cd emacs-25.1/
$ ./configure --without-x
$ make
$ sudo make install
$ emacs --version
GNU Emacs 25.1.1
Copyright (C) 2016 Free Software Foundation, Inc.
GNU Emacs comes with ABSOLUTELY NO WARRANTY.
You may redistribute copies of GNU Emacs
under the terms of the GNU General Public License.
For more information about these matters, see the file named COPYING.

caskをインストールする

Macではbrewで提供されているので、brew入れた後にパス通してくれますが、centOSはソースからビルドするので、パスを通す必要あり。

$ curl -fsSL https://raw.githubusercontent.com/cask/cask/master/go | python
$ export PATH="$HOME/.cask/bin:$PATH"

ここでcaskのファイルはリポジトリの中にある
caskのコマンドを実行した時に、すでにインストールしていた.emacs.d のディレクトリ配下の.cask以下にコマンドを移動する

caskでパッケージ入れる

# コマンドは以下
$ /.cask/.cask/bin/cask
$ cd .emacs.d/
$ cask
# cask-bootstrap cask-cli cask がなくcaskが実行できない
# この状態でemacsを起動するとcaskがないと言われて起動できない

Macbrew経由でcaskを入れた場合はこのあたりをよしなにしてくれていたけど、CentOSでソースから入れた場合はcaskの立ち上げ*.elファイルを.emacs.d/.cask配下に置かないとcaskが起動しない。

$ cd
$ cp .cask/cask-bootstrap.el ../.emacs.d/.cask/
$ cp .cask/cask.el ../.emacs.d/.cask/
$ cp .cask/cask-cli.el ../.emacs.d/.cask
$ cd ../.emacs.d/
$ cask
# これでcaskが実行されてパッケージが入る

カスタムUIStackViewクラス内の子要素を削除する

UIStackViewとは?

iOS9から導入された概念
UIView郡をUIStackView内に入れ子として管理できる。
UIStackViewが親でUIButtonなどの各UIパーツが子要素になる。

Apple公式チュートリアル内でボタンを削除する

JumpRightIn

対象となるコードはこちら(抜粋)

private var ratingButtons = [UIButton]()

// clear any existing buttons
for button in ratingButtons {
    removeArrangedSubview(button)
    button.removeFromSuperview()
}
ratingButtons.removeAll()

UIStackViewの削除

メソッドの一つ一つ動作

  1. removeArrangedSubView でUIStackViewに割り当てられているUIパーツの配列から該当UIパーツを削除する
  2. burron.removeFromSuperview でSuperViewからUIButtonの参照を外す
  3. ratingButtons.removeAll() で配列を空にする

arrangedSubview はSubview(ここではUIStackView)に組み込まれたViewのこと。公式チュートリアルでは星型のUIButtonがこれにあたる。
このarrangedSubview は中に配列としてUIパーツを持つので、最初に対象のUIパーツをこの配列から外す。
次に、removeFromSuperView で対象のUIパーツの参照を親のViewから外す。

これで参照されるUIパーツがUIViewから削除されて新しくボタンを定義できるようになる。

参照 メソッドの意味

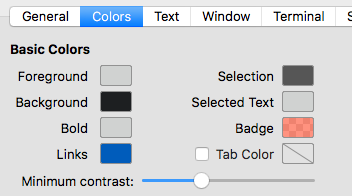
iTermのブルーが見づらかったので調整した話

iTerm2で青色がすごく見づらかった…

iTerm2で作業する時に青が見えづらくてしかたなかったので、青の文字の色彩を調整しました。
調整の仕方は、iTerm2の設定(Cmd + ,)を開いて、Profile -> Defauktの外観の設定 -> Colorを選択
Minimun Contrastを調整して、コントラストをいい感じにすると背景の黒と青文字のコントラストが変わって見やすくなります。

Markdownを書こうとしたり、ターミナルでディレクトリ見たりする時に大体、青色がものすごく見づらかったので、非常に目に優しくなりました

image

Bundleを使った画像のロードとキャッシュ from Apple公式チュートリアル

AppleiOS開発の公式チュートリアルに記載されている画像の読み込みについての備忘録。
画像はAssetsに入っているものとし、アプリ内で保持している画像を読み込むという前提。

対象箇所

Appleの公式チュートリアル「JumpRightIn」での画像を指定している箇所は以下。

// Load Button Images
let bundle = Bundle(for: type(of: self))
let filledStar = UIImage(named: "filledStar", in: bundle, compatibleWith: self.traitCollection)
let emptyStar = UIImage(named:"emptyStar", in: bundle, compatibleWith: self.traitCollection)
let highlightedStar = UIImage(named:"highlightedStar", in: bundle, compatibleWith: self.traitCollection)

画像の読み込みとキャッシュの方法について

定数ごとに考察していく。

let bundle = Bundle(for: (type: self)) について

これは、公式のリファレンスを参照すると省略せずに記載すると以下のようになる。

let bundle = Bundle.init(for: (type: self))

公式リファレンスには

//Creating and Initializing a Bundle

init(for: AnyClass)
Returns the NSBundle object with which the specified class is associated.

とあって、任意のクラスに関連する NSBundle オブジェクトを返す。

let **Star = UIImage(named:, in: bundle, compatibleWith: self.traitCollection) について

次にUIImageを初期化している箇所について触れていく。
UIImageの初期化の方法は省略せずに書くと以下

let **Star = UIImage.init?(named: String, in: Bundle?, compatibleWith: UITraitCollection?)

第1引数…Assetsに登録した名称を入れることでAssetsに登録した画像を使える。
第2引数…Bundleオブジェクトを指定することで画像をキャッシュできる。どういうことかというと、Bundleは入れ物オブジェクトのようなものなので、定義したBundleの中に、empty/filled/highlited の3つのステータスの画像を入れることで、3つの画像アセットをキャッシュすることができる。
第3引数…ここでのselfはRatingControlクラスそれ自体を表す。traitCollectionは該当の画像がUIStackViewに関連付けられているかを確認する(公式リファレンスだと、正確にするという訳がつけられる。)
ちなみにnilを入れることも可能であるが、nilの場合、RatingControlのStackViewではなく、この画面のUIView本体に紐づくので、ここではselfでRatignControlクラス自体を指定していると思われる。

参考

以下公式リファレンス参照
Bundle
UIImage
UIImage.init?
Array
enumrated

AtomでMarkdownを使うためのセットアップ

atommarkdownシンタックスハイライトとライブプレビューを使うお話です。

使っているパッケージ

  1. language-markdown
  2. linter-markdown

Core 1. markdown-preview

Markdownプレビュー

Ctl + Shift + Alt を同時に押した状態でキーボードの「M」を押すとMarkdownのプレビューが見れる

お試し投稿

お試し投稿です。

jekyll now で作ったgithubページから移行

もともと jekyll now を使った静的ページでブログ書いてましたが、画像等々を上げる時にホストするサーバーだったりを用意したりするのがめんどくさかったので、どうしようか考えたところ、はてブmarkdownでブログかけるtコトをしったので、思い切ってこちらに変更しました。
とりあえず過去にjekyllで書いた記事はこちらに移行。

ちなみに、はてブには今まで通り技術的な学習の記録だけ書いて、とりあえず無駄なつぶやきは note に書き流していこうと思います。